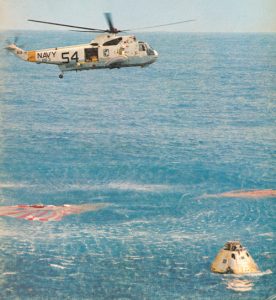
Bring ’em On Home!
1/48 Scale Apollo 9 Crew Recovery Diorama
Whether coming back from earth or lunar orbit, U. S. Air Force and Navy units were ready and able to recover the Nation’s Apollo astronauts after their missions. This diorama depicts the recovery of the Apollo 9 crew, Colonel Jim McDivitt (USAF), Colonel Dave Scott (USAF) and Rusty Schweickart on March 13, 1969 by the prime recovery ship, the USS Guadalcanal (LPH-7), 160 Nautical miles east of the Bahamas. Primary assets involved consisted of Underwater Demolition Team 22 (UDT-22) and Helicopter Anti-Submarine Squadron 3 (HS-3 “Tridents”). Beginning with Scott Carpenter’s Project Mercury mission (MA-7), this was the Tridents fifth and last manned spaceflight mission recovery operation.
Apollo 9 was the third manned Apollo flight and the first to rehearse all three Apollo spacecraft elements (the Command and Service Modules and the Lunar Module) that would be used later that year to land the first men on the moon. On this Earth-orbital mission, the Command Module splashed down in calm seas in the western Atlantic. After splash-down the astronauts removed their pressure suits and were recovered in their in-flight coveralls. These lightweight garments were worn during the mission when the crew members did not need their pressure suits. The pilot of “Swim 1” the call sign for the prime recovery helicopter was Commander G. M. Rankin, Commanding Officer of HS-3, a co-pilot, two crew members and a NASA doctor filled out the crew. Initially three swim team members from UDT-22 were also on-board.
The Hasegawa SH-3H kit was backdated to a SH-3D. This conversion included shortening the horizontal tail, removal of the left-side forward cargo area window and replacement of the H models’ elongated sponsons with resin short sponsons made by Belcher Bits. Other modifications included unloading all three landing gear struts, removing the dipping sonar, opening the cargo door and scratch-building some of the details in the cargo bay interior. The front half of the pilot and co-pilot’s side windows were also modified so they could be shown in the open position. The main rotor blades were re-shaped into an in-flight lifting configuration and photo-etch prop blur blades were used on the tail rotor. Specific additions, required by NASA included the two SARA/Yagi antenna installations on the sponson supports, the “Billy Pugh” recovery net and the camera suite installed to the rear of the cargo door. With the exception of the tail rotor blades and the sponsons, all added details were scratch-built. Tamiya Flat White and Gunze Aqueous Light Gull Gray (H51) was applied after the helo was pre-shaded with Tamiya German Gray (XF-63). The helicopter’s markings were created in Adobe Illustrator, and then printed on an Alps printer. Insignia and rescue arrows were scrounged from various after-market decal sheets.
The Command Module, floatation collar and recovery rafts were entirely scratch-built. Wooden masters for the major parts of the CM were turned on a lathe and then vacuformed with all other details created out of styrene sheet, strip and rod. The CM was covered with strips of Bare-Metal Matte aluminum Foil and then thin coats of Tamiya Clear Yellow (X-24), Sky Gray (XF-19) and Deck Tan (XF-55) were airbrushed over the foil in somewhat random patterns. The rafts and floatation collar were created mainly out of Milliput.
The diorama base has 2-1/4” deep sides to support the helicopter stand and to give a sense of depth to the water. The insides of the base were scumbled with three shades of blue paint to help create the sense of depth to the water. The base for the water surface itself was cut out of a 1/16” thick textured acrylic fluorescent light fixture cover. The undersurface of the acrylic sheet was randomly airbrushed with some Tamiya clear blue and green paint. On the upper surface, a coat of Testors acrylic clear flat was airbrushed on prior to the gel being applied. This helped to cut some of the gloss finish of the acrylic. The helicopter main-rotor “wash” effects were created using multiple coats of Liquitex Matte Gel Medium. The first two coats were tinted with different amounts of blue food coloring with the final two coats kept clear. The concentric rotor wash pattern was sculpted into the initial coats by affixing a printed concentric ring pattern to the underside of the acrylic sheet. In a bit of artistic license I chose to include a parachute shape under the waters’ surface. The parachute was drawn out, printed in color, cut out, wrinkled and attached to a small wooden block just below the surface of the acrylic sheet.
There are a total of 11 figures in the diorama; parts from Monogram, Hasegawa and Tamiya pilots, ground crew members and solders were used to create these figures. With the exception of the pilot and co-pilot, all figures were heavily modified. On the figures, all extra detail was constructed from scratch using fine wire, plastic and Tamiya two-part epoxy putty.
Images of finished diorama.


